
本文中使用的 MongodbSourceConnector 是 io.debezium.connector.mongodb.MongoDbConnector 2.2.1.Final。
机制简介 #
为了提供管理快照的灵活性,Debezium 包含一个补充快照机制,称为增量快照。增量快照依赖于 Debezium 机制向 Debezium 连接器发送信号。‼️ 增量快照运行时,不会阻塞变更流事件处理。
初始快照会先保存 change stream 的位点,开始执行全量快照,全量快照完成后,再从保存的位点开始增量处理变更事件。
目前 Debezium 支持增量快照的连接器有:
- Db2
- MariaDB (Technology Preview)
- MongoDB
- MySQL
- Oracle
- PostgreSQL
- SQL Server
发送这个信号支持多种方式,通过配置 signal.enabled.channels 来指定,默认为 source(也就是数据集合方式),可选值有:source、kafka、file 和 jmx:
- source 源数据库: 配置
signal.data.collection来指定集合 - kafka: 配置
signal.kafka.topic来指定 topic - file: 配置
signal.file来指定文件路径,写入文件的格式数据为 JSON,字段取值参考下面的表格。 - jmx: 启用
JMX MBean Server来暴露 signaling bean
需要启用增量快照时,只需要向特定方式中写入数据即可。如果是 source 只需要向数据库中插入一条数据,如果是 kafka 那么则是投递一条消息。
source(mongodb) 集合数据格式:
<signalDataCollection>.insert({
    "id" : _<idNumber>,            // 增量快照信号文档的 ID,必须唯一, 使用 UUID 等方式生成, mongodb 中作为 _id 字段
    "type" : <snapshotType>,       // 信号类型,固定值: execute-snapshot, stop-snapshot, pause-snapshot, resume-snapshot
    "data" : {                     // 信号数据,根据 type 不同而不同, 这里以 execute-snapshot 为例
        "data-collections" : [     // 要执行增量快照的数据集合,必须是已注册的集合
            "<collectionName>",
            "<collectionName>"
        ],
        "type": <snapshotType>,      // 快照类型: `incremental`  和 `blocking`
        // 注意:2.2.1-Final 中不支持 additional-conditions,2.7.0-Alpha1 开始支持
        "additional-conditions": [   // 可选,增量快照时的筛选条件
            {
                "data-collection" : "<collectionName>",  // 指定集合
                "filter" : "<additional-condition>"        // 可选,增量快照时的筛选条件,如:`age > 18`
            }
        ]
    }
});
举例如下:
{
  "id": "execute-mode-snapshot-sample",
  "type": "execute-snapshot",
  "data": {
    "data-collections": [
      "test.users"
    ],
    "type": "incremental",
    "additional-conditions": [
      {
        "data-collection": "test.users",
        "filter": "age > 18"
      }
    ]
  }
}
kafka 消息格式:
Key = `test_connector`
Value = `{"type":"execute-snapshot","data": {"data-collections": ["schema1.table1", "schema1.table2"], "type": "INCREMENTAL"}}`
其实现基于 DDD-3 设计文档 ;官方详细介绍在 debezium mongodb incremental-snapshots。
使用场景 #
增量快照提出的背景是:
- Debezium 通常通过数据库事务日志流式传输变更数据。然而,初始快照(即捕获既有数据)是全表扫描。这种方式不仅耗时长,而且一旦中断就需要从头开始。
- 在某些场景下,我们不需要立即获取全部历史数据。有时,我们还需要在 connector 运行期间动态添加新表,且不希望暂停数据流转。
具体举例来说:
- 假设 Source Connector 已经将变更同步到 Kafka 中。但在 Sink Connector 消费之前,Kafka 中的 topic 被错误删除。这时如果想要恢复这些数据,使用初始化快照会非常笨重和麻烦。
- 假设集合 A 拥有超大数据量,执行完整快照需要 5 个小时。但数据库的 oplog 最多只能保存 1 个小时的变更事件。在这种情况下,如果使用初始快照,就无法实现完整的数据同步。
使用演示 #
假设已经搭建好了一整套 CDC 系统: 将 mongodb 中的 test.users 同步到 ES 中。
1. 创建存量数据 #
为了演示增量快照的使用,我们先向 test.users 集合中插入 5 条数据:
for(let i = 1; i <= 5; i++) {
  db.users.insertOne({
    name: 'Pre-connector User ' + i,
    email: 'pre' + i + '@example.com',
    created_at: new Date()
  });
}
2. 创建 Connector #
其中 Source Connector 配置如下:
{
    "name": "mongodb-source",
    "config": {
        "connector.class": "io.debezium.connector.mongodb.MongoDbConnector",
        "mongodb.connection.string": "mongodb://mongodb:27017/?replicaSet=rs0",
        "topic.prefix": "mongodb-cdc",
        "database.include.list": "test",
        "collection.include.list": "test.users",
        "snapshot.mode": "never",                            // 快照模式,never 代表不执行快照,只处理变更流(如果是大数据集合,建议使用 never,通过增量快照来处理存量数据)
        "incremental.snapshot.chunk.size": "1024",           // 增量快照每次处理的文档数
        "incremental.snapshot.allow.schema.changes": "true", // 是否允许增量快照时集合的 schema 发生变化
        "signal.data.collection": "test.debezium_signal"     // 增量快照信号集合
    }
}
# 创建 Source Connector
curl -X POST http://localhost:8083/connectors -H "Content-Type: application/json" -d @connector-tasks/mongodb-source.test.users.json

# 创建 Sink Connector
curl -X POST http://localhost:8083/connectors -H "Content-Type: application/json" -d @connector-tasks/es-sink.mongodb.users.json
3. 检查存量数据是否被同步到 ES 中 #
我们可以通过查询 ES 中的 mongodb-cdc-test-users 索引来检查存量数据是否被同步到 ES 中:
> sleep 10 && curl -X GET "http://localhost:9200/_cat/indices?v" && \
    echo && curl -X GET "http://localhost:9200/mongodb-cdc.test.users/_count"

  % Total    % Received % Xferd  Average Speed   Time    Time     Time  Current
                                 Dload  Upload   Total   Spent    Left  Speed
100    83  100    83    0     0   1659      0 --:--:-- --:--:-- --:--:--  1693
health status index uuid pri rep docs.count docs.deleted store.size pri.store.size

{
  "error": {
    "root_cause": [
      {
        "type": "index_not_found_exception",
        "reason": "no such index [mongodb-cdc.test.users]",
        "resource.type": "index_or_alias",
        "resource.id": "mongodb-cdc.test.users",
        "index_uuid": "_na_",
        "index": "mongodb-cdc.test.users"
      }
    ],
    "type": "index_not_found_exception",
    "reason": "no such index [mongodb-cdc.test.users]",
    "resource.type": "index_or_alias",
    "resource.id": "mongodb-cdc.test.users",
    "index_uuid": "_na_",
    "index": "mongodb-cdc.test.users"
  },
  "status": 404
}
可以看到,ES 中没有 mongodb-cdc-test-users 索引,说明存量数据还没有被同步到 ES 中。
4. 插入数据验证变更流处理正常 #
为了验证变更流处理正常,我们向 test.users 集合中插入一条数据:
db.users.insertOne({
  name: 'CDC Test User',
  email: '[email protected]',
  created_at: new Date()
});
再检查 ES 中的 mongodb-cdc-test-users 索引,可以看到新增的数据:
> sleep 10 && curl -X GET "http://localhost:9200/mongodb-cdc.test.users/_count"

{
  "count": 1,
  "_shards": {
    "total": 1,
    "successful": 1,
    "skipped": 0,
    "failed": 0
  }
}
5. 触发增量快照-模拟大数据集合 #
现在向 test.debezium_signal 集合中插入一条文档:
db.debezium_signal.insertOne({
  _id: 'never-mode-snapshot', // 增量快照信号文档的 ID,必须唯一, 使用 UUID 等方式生成
  type: 'execute-snapshot',
  data: {
    'data-collections': ['test.users'],
    'type': 'incremental'
  }
});
再检查 ES 中的 mongodb-cdc-test-users 索引,可以看到增量快照处理完成后,数据总数为 6:
> sleep 10 && curl -X GET "http://localhost:9200/mongodb-cdc.test.users/_count"

{
  "count": 6,
  "_shards": {
    "total": 1,
    "successful": 1,
    "skipped": 0,
    "failed": 0
  }
}
| 场景 | Mongodb 中数据 | ES 中数据 | kafka 中消息 |
|---|---|---|---|
| 触发前 | 6 条 | 1 条 | 1 条 |
| 触发后 | 6 条 | 6 条 | 7 条 |
6. 触发增量快照-重新快照 #
这时候再触发一次增量快照,模拟重新触发增量快照的场景:
db.debezium_signal.insertOne({
  _id: 'never-mode-snapshot-again', // 增量快照信号文档的 ID,必须唯一, 使用 UUID 等方式生成
  type: 'execute-snapshot',
  data: {
    'data-collections': ['test.users'],
    'type': 'incremental'
  }
});
这时候再检查 ES 中的 mongodb-cdc-test-users 索引,可以看到增量快照处理完成后,数据总数为 6(ES Sink 采用了 upsert 模式):
> sleep 10 && curl -X GET "http://localhost:9200/mongodb-cdc.test.users/_count"

{
  "count": 6,
  "_shards": {
    "total": 1,
    "successful": 1,
    "skipped": 0,
    "failed": 0
  }
}
| 场景 | Mongodb 中数据 | ES 中数据 | kafka 中消息 |
|---|---|---|---|
| 触发前 | 6 条 | 6 条 | 7 条 |
| 触发后 | 6 条 | 6 条 | 13 条 |
可以看到,kafka 中消息增加了 6 条,说明全部的 6 条数据又被快照了一次。
实现原理 #
Debezium 的实现方案参考了:DBLog: A Watermark Based Change-Data-Capture Framework 这篇论文。
We wanted to (a) trigger the full state capture at any point in time. That is because the full state may not only be needed initially and may be needed at any time afterwards. For instance if the database is restored from a backup or for repairs if there is data loss or corruption downstream. There are also cases where only a subset of data needs to be repaired, for example if a specific set of rows has been identified to be corrupt downstream. (b) pause or resume at any time so that full state capture does not need to start from the beginning for large tables after restarting the process. (c) capture transaction log events and the full state side by side without stalling one or the other. There are use cases that require high availability of transaction log events so that the replication lag to the source is kept to a minimum. (d) prevent time-travel, by preserving the order of history when transmitting events to a derived datastore. This way an earlier version of a row (like the residential address of a member account) is not delivered after a later version. Hence, a solution had to combine transaction log events and the full state in a way that preserves the history of changes. (e) offer this as a platform. Hence it was crucial to minimize the impact on the source database. Otherwise this can hinter adoption of the platform, especially for use cases that have high traffic. In that regard we want to avoid primitives such as table locks which can block application write traffic. (f) function across a variety of Relational Database Management Systems (RDMBS), such as MySQL, PostgreSQL, Aurora [ 19 ] etc, that we use in production. In order to achieve that we wanted to avoid using vendor specific features
可以看到 DBLog 想要解决以下的问题:
a) 随时触发全量快照,更灵活
b) 随时暂停或恢复,让大表不需要重头开始快照
c) 快照和实时变更事件可以并行处理,互不干扰
d) 防止时间旅行(变更事件的时序不能错乱),按变更顺序处理事件
e) 提供平台化的解决方案,最小化对源数据库的影响
f) 支持跨多种 RDBMS,如 MySQL, PostgreSQL, Aurora 等
1. DBLog - 顶层架构 #
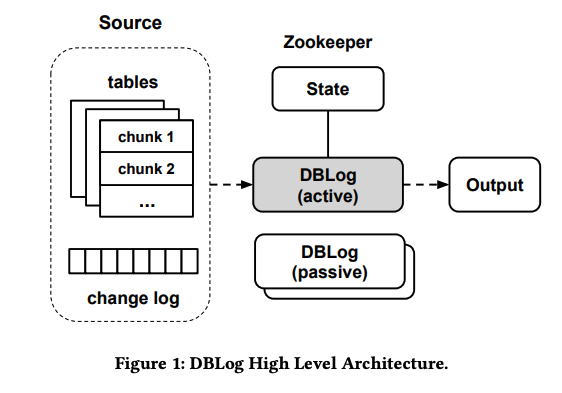
DBLog 将从 Source 按照 chunk 大小分块依次读取全表,并同时处理 change log,将处理好的数据写入到 Output 中去,于此同时通过 State 组件跟踪记录。
它采用了主从架构来提供高可用支持, 这不是我们关注的重点,就不展开了。
2. DBLog - 实现细节 #
想要实现这样的解决方案,绕不开两方面的数据捕获,分别是:
a) 增量变更事件
增量变更事件代表了数据库中发生的每次变更操作,包括插入、更新和删除,这些事件会被实时捕获并处理。
b) 全量快照
全量快照是指对数据库中的所有数据进行一次完整的备份或复制。
但是很明显,增量和全量不能简单的并行处理。按照其他方案的处理方式,全量快照要么会暂停增量捕获(如 Maxwell 和 Debezium),要么需要创建一个副本(MySQLStreamer),还有些会加上表锁(如 Debezium, 锁定的取决于数据库和实现)。这些方法这对于大型数据库来说是不可接受的。
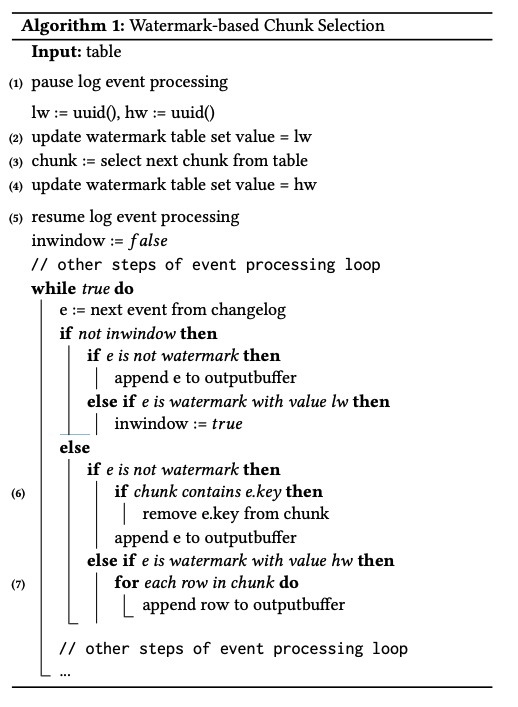
为了解决这一问题,DBLog 提出的解决方案是:将增量和全量快照合并处理。具体来说:
其算法描述如下图:
举例演示如下图:
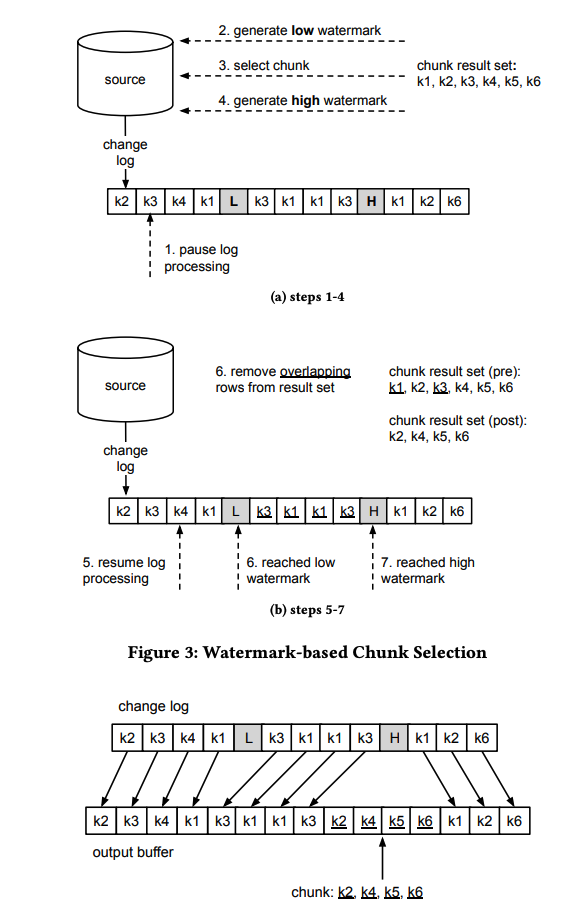
总结来说,DBLog 提出的解决方案是:
- 全量快照采用 分块 的方式从数据集合中 读出(这要求表/集合的 PK 是有序的且稳定的)。
- 向变更流中插入 Low Watermark(LW)和 High Watermark(HW),分别表示全量快照的开始和结束位置。
- 将全量 Chunk 和 增量变更事件合并,生成全新的事件流。
通过分块读,可以实现对大部分数据库的兼容,不需要依赖于数据库的特定功能。chunk 跟 增量事件合并实现了宏观上的并行处理,保证了增量事件的实时性。水印则可以用来控制 chunk 的大小 和 控制快照的起停。
3. Debezium 实现源码 #
知道了整个增量快照的实现思路后,现在来看看 Debezium 是如何实现的。io.debezium.pipeline.signal.AbstractSnapshotSignal 抽象了增量快照的几个信号:
public abstract class AbstractSnapshotSignal<P extends Partition> implements Signal.Action<P> {

    private static final Logger LOGGER = LoggerFactory.getLogger(AbstractSnapshotSignal.class);
    protected static final String FIELD_DATA_COLLECTIONS = "data-collections";
    protected static final String FIELD_TYPE = "type";
    protected static final String FIELD_ADDITIONAL_CONDITION = "additional-condition";
    protected static final String FIELD_SURROGATE_KEY = "surrogate-key";

    // 忽略其他代码...
}
信号创建后,会触发对应信号的 arrived 方法,这里以 io.debezium.pipeline.signal.ExecuteSnapshot 为例:
public boolean arrived(Payload<P> signalPayload) throws InterruptedException {
    final List<String> dataCollections = getDataCollections(signalPayload.data);
    if (dataCollections == null) {
        return false;
    }
    SnapshotType type = getSnapshotType(signalPayload.data);
    Optional<String> additionalCondition = getAdditionalCondition(signalPayload.data);
    Optional<String> surrogateKey = getSurrogateKey(signalPayload.data);
    LOGGER.info("Requested '{}' snapshot of data collections '{}' with additional condition '{}' and surrogate key '{}'", type, dataCollections,
            additionalCondition.orElse("No condition passed"), surrogateKey.orElse("PK of table will be used"));
    switch (type) {
        case INCREMENTAL:
            dispatcher.getIncrementalSnapshotChangeEventSource().addDataCollectionNamesToSnapshot(
                    signalPayload.partition, dataCollections, additionalCondition, surrogateKey, signalPayload.offsetContext);
            break;
    }
    return true;
}
可以看到,如果是增量快照,会调用 IncrementalSnapshotChangeEventSource 的 MongoDbIncrementalSnapshotChangeEventSource#addDataCollectionNamesToSnapshot 方法:
- 此方法会触发
readChunk方法; readChunk方法会先触发emitWindowOpen方法,再执行实际的分块读取和处理逻辑createDataEventsForDataCollection;readChunk方法会触发emitWindowClose方法;emitWindowClose实际上会发出snapshot-window-close信号,被io.debezium.pipeline.source.snapshot.incremental.CloseIncrementalSnapshotWindow处理;
public void addDataCollectionNamesToSnapshot(MongoDbPartition partition, List<String> dataCollectionIds,
                                              Optional<String> additionalCondition, Optional<String> surrogateKey, OffsetContext offsetContext)
        throws InterruptedException {
    // 忽略其他代码...
    final boolean shouldReadChunk = !context.snapshotRunning();
    if (shouldReadChunk) {
        readChunk(partition);
    }
}

protected void readChunk(MongoDbPartition partition) throws InterruptedException {
    try {
        // 触发窗口打开事件
        emitWindowOpen();
        while (context.snapshotRunning()) {
            // 读取 chunk 数据到 window 中
            createDataEventsForDataCollection(partition);
            // 如果 window 为空,说明当前数据集合已经读取完毕
            if (window.isEmpty()) {
                LOGGER.info("No data returned by the query, incremental snapshotting of table '{}' finished",
                        currentDataCollectionId);
                collectionScanCompleted(partition);
                nextDataCollection(partition);
            }
            else {
                break;
            }
        }
        // 触发窗口关闭事件
        emitWindowClose();
    }
    // 省略其他代码...
}

private void createDataEventsForDataCollection(MongoDbPartition partition) throws InterruptedException {

    mongo.execute("chunk query key for '" + currentCollection.id() + "'", client -> {
        // 构造查询条件:_id <= maxKey (快照启动时,整个文档的最大主键值)
        final Document maxKeyPredicate = new Document();
        final Document maxKeyOp = new Document();
        maxKeyOp.put("$lte", context.maximumKey().get()[0]);
        maxKeyPredicate.put(DOCUMENT_ID, maxKeyOp);

        Document predicate = maxKeyPredicate;

        // 如果上一次读取的最大主键值不为空,那么构造查询条件:_id > chunkEndPosition (上一次读取的最大主键值)
        if (context.chunkEndPosititon() != null) {
            final Document chunkEndPredicate = new Document();
            final Document chunkEndOp = new Document();
            chunkEndOp.put("$gt", context.chunkEndPosititon()[0]);
            chunkEndPredicate.put(DOCUMENT_ID, chunkEndOp);
            predicate = new Document();
            predicate.put("$and", Arrays.asList(chunkEndPredicate, maxKeyPredicate));
        }

        // 按照 PK 主键升序查询,限制返回的记录数为 incremental.snapshot.chunk.size
        for (BsonDocument doc : collection.find(predicate).sort(new Document(DOCUMENT_ID, 1))
                .limit(connectorConfig.getIncrementalSnashotChunkSize())) {

            // 放入 window 中, keyStruct 为主键
            window.put(keyStruct, row);
        }

        // 设置下一次 read chunk 的下限为这一次读取的最大主键值
        context.nextChunkPosition(lastKey);
    });
}
而 CloseIncrementalSnapshotWindow 实际上会回调 IncrementalSnapshotChangeEventSource#closeWindow 方法
// class CloseIncrementalSnapshotWindow
public boolean arrived(Payload<P> signalPayload) throws InterruptedException {
    dispatcher.getIncrementalSnapshotChangeEventSource().closeWindow(signalPayload.partition, signalPayload.id,
            signalPayload.offsetContext);
    return true;
}
因此逻辑又回到了 MongoDbIncrementalSnapshotChangeEventSource 中:
    public void closeWindow(MongoDbPartition partition, String id, OffsetContext offsetContext) throws InterruptedException {
        // 将 window 中的数据发送
        sendWindowEvents(partition, offsetContext);

        // 触发下一个分块读取
        readChunk(partition);
    }
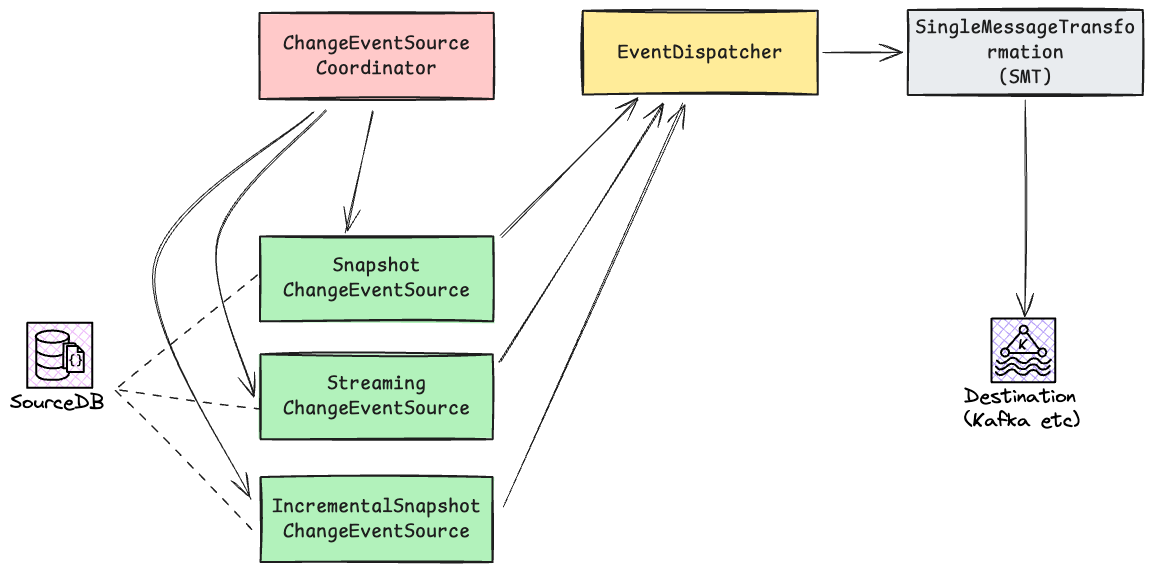
另外在 Debezium 中, ChangeEventSourceCoordinator 会协调 SnapshotChangeEventSource 和 StreamingChangeEventSource 的执行,这两者产生的事件会进入到 EventDispatcher 中的共享队列中。
// ChangeEventSourceCoordinator#executeChangeEventSources
protected void executeChangeEventSources(CdcSourceTaskContext taskContext, SnapshotChangeEventSource<P, O> snapshotSource, Offsets<P, O> previousOffsets,
                                          AtomicReference<LoggingContext.PreviousContext> previousLogContext, ChangeEventSourceContext context)
        throws InterruptedException {
    final P partition = previousOffsets.getTheOnlyPartition();
    final O previousOffset = previousOffsets.getTheOnlyOffset();

    previousLogContext.set(taskContext.configureLoggingContext("snapshot", partition));
    SnapshotResult<O> snapshotResult = doSnapshot(snapshotSource, context, partition, previousOffset);

    if (running && snapshotResult.isCompletedOrSkipped()) {
        previousLogContext.set(taskContext.configureLoggingContext("streaming", partition));
        streamEvents(context, partition, snapshotResult.getOffset());
    }
}
在梳理过程中,我没有发现 Debezium 中有 DBLog 中提到的 Low Watermark 和 High Watermark 相关的逻辑,而是在 EventDispatcher 中,当 StreamingChangeEvent 提交时 (dispatchDataChangeEvent 方法),通知增量快照对窗口中的事件进行去重。
这里我个人没有梳理清楚,增量快照 和 实时流变更 的事件顺序是怎么样的,看起来是和 DBLog 中的实现不完全一致。
Debezium 这一块的架构梳理如下:
总结 #
增量快照相比初始快照,更加灵活可控;对于大型数据库或者集合的快照过程更友好,不会影响实时流变更的处理。