这里不会过多的介绍软件的相关概念和架构,主要是针对实际问题的解决方案和思考。
问题汇总 #
-
CDC 相关
- CDC kafka-connect mysql sink 侧消费积压问题
- CDC kafka-connect mysql source 侧删除事件投递了两条事件,导致删除动作数据量被放大
- CDC kafka-connect mongodb 数据同步任务异常(消息超过 1MB )
更新于: 2025-02-06
更新于:2025-10-11
-
DMS 数据同步相关
-
Istio 相关
-
APISIX 相关
-
ShardingSphere Proxy
-
Kafka 相关
-
Pyroscope 相关
-
Doris 相关
1. CDC 相关 #
CDC 是 Change Data Capture 的缩写,即变更数据捕获。CDC 是一种软件模式,用于捕获和跟踪数据库中的变更。CDC 通常用于复制数据、数据集成和数据仓库加载等场景。
这里 CDC 的技术实现为使用 kafka-connect 连接 mysql 和 mongodb 将数据同步到异构系统中 elasticsearch。source 和 sink connector 使用的 debezium 插件。kafka-connect 是基于 kafka 构建的沟通数据系统的可靠工具,它最常用于将数据异构存储,以满足离线查询和分析、数据仓库、数据湖等需求。
这里使用到 mysql source connector 的配置如下:
{
    "name": "xxx",
    "connector.class": "io.debezium.connector.mysql.MySqlConnector",
    "include.schema.changes": "true",
    "topic.prefix": "mysql-xxx",

    // 配置了 Reroute transform,将 真实表 归集到一个 逻辑表对应的 topic 中
    "transforms": "Reroute",
    "transforms.Reroute.type": "io.debezium.transforms.ByLogicalTableRouter",
    "transforms.Reroute.topic.regex": "xxx",
    "transforms.Reroute.key.enforce.uniqueness": "false",
    "transforms.Reroute.topic.replacement": "<topic_prefix>",

    "schema.history.internal.kafka.topic": "mysql-connector.schemahistory.xxx",
    "schema.history.internal.kafka.bootstrap.servers": "<kafka_server>",

    "database.include.list": "<database_name or regex>",
    "database.port": "<mysql_port>",
    "database.hostname": "<mysql_host>",
    "database.password": "<mysql_pass>",
    "database.user": "<mysql_user>",
    "table.exclude.list": "<table_name or regex>",
}
mysql sink connector 的配置如下:
{
    "name": "<connector name>",
    "connector.class": "io.confluent.connect.elasticsearch.ElasticsearchSinkConnector",
    "behavior.on.null.values": "DELETE",
    "tasks.max": "1", // 任务数对应 consumer group 的消费者实例数
    "key.ignore": "false",
    "write.method": "UPSERT",
    "connection.url": "<es_addr>",
    "topics.regex": "<topic_regex>",

    "transforms": "unwrap,key",

    // unwrap tranform 配置,处理删除事件:将删除事件的 value 设置为 null
    "transforms.unwrap.type": "io.debezium.transforms.ExtractNewRecordState",
    "transforms.unwrap.delete.handling.mode": "none",
    "transforms.unwrap.drop.tombstones": "false",

    // key tranform 配置,设置 ES 的 docID 为 mysql 数据表中的id (主键)
    "transforms.key.field": "id",
    "transforms.key.type": "org.apache.kafka.connect.transforms.ExtractField$Key",
}
1.1 CDC kafka-connect mysql sink 侧消费积压问题 #
积压的原因,针对 mysql source / sink connector 只使用了一个分区。众所周知 topic 分区数会直接影响到消费的并发度,如果只有一个分区,那么只有一个消费者可以消费,消费者的消费速度就会受到限制。解决方案是增加分区数,增加消费者的并发度。
这里存在的疑惑是:
- mysql 相关的 connector 是否只能使用一个分区?还能否保证顺序消费?
- 有人反馈的的只能使用一个分区的 topic 是指的这部分吗?
- 增加 topic 数之后,source connector 和 sink connector 都能够增加并行的任务吗?
文档查阅和实验:
在最开始使用时,当时确定为只有一个分区是由于文档中提及了:
https://debezium.io/documentation/reference/stable/connectors/mysql.html#mysql-schema-change-topic
Never partition the database schema history topic. For the database schema history topic to function correctly, it must maintain a consistent, global order of the event records that the connector emits to it.
To ensure that the topic is not split among partitions, set the partition count for the topic by using one of the following methods:
If you create the database schema history topic manually, specify a partition count of 1.
If you use the Apache Kafka broker to create the database schema history topic automatically, the topic is created, set the value of the Kafka num.partitions > configuration option to 1.
但是实际上看来,这里的意思是指的 schema history topic 而不是其他的 topic。唯一找到限制是 mysql source connector task 只能为 1 如下所示:
Default value: 1
The maximum number of tasks to create for this connector. Because the MySQL connector always uses a single task, changing the default value has no effect.
因此分区数为 1 只是“历史”问题,实际上可以增加分区数,以增加消费侧并发度。
另外文档中也说明了 source connector 投递消息的 message key 可以自定义 key, 其默认值为数据库表的主键,这样可以保证同一条数据的变更事件被投递到同一个分区中,从而保证了顺序性。
如下是真实环境中一条数据的变更事件的 message key 示例:
{
  "schema": {
    "type": "struct",
    "fields": [
      {
        "type": "int64",
        "optional": false,
        "field": "id"
      }
    ],
    "optional": false,
    "name": "$connectorName.$dbName.$tblName.Key"
  },
  "payload": {
    "id": 1075966706511257600 // 唯一的变量,即主键列的值
  }
}
处理手段:
- 调整 mysql sink connector 的 topic 分区数,增加并发度。
./kafka-topics.sh --bootstrap-server <kafka_server> --alter --topic <topic_name> --partitions <new_partition_num>
- 调整 mysql sink connector 的任务数与分区数一致(这里20为示例),以保证每个任务都能够消费到数据。
- “tasks.max”: "1"
+ “tasks.max”: "20"
注意:增加分区数,大概率会导致某些消息从之前的分区被投递到新的分区,这样会导致消息的顺序性被打乱,因此要谨慎处理,要么能够容忍这种异常,要么事后恢复最终一致,也可以先停止生产等消费完毕后再行调整。
1.2 CDC kafka-connect mysql source 侧删除事件投递了两条事件,导致删除动作数据量被放大 #
这个问题的背景是,mysql 部分表数据量极大,个别单表超过 100 million 条数据,且日增量极大,因此会定期删除。定期删除一开始选择的是使用 mysql Event Scheduler 定时任务 + Procedure 删除,但这种方式对于运维人员的要求较高,且不够灵活(分库分表场景下),其次在业务高峰期删除操作会影响到业务的正常运行。因此另外选择了自行实现一个定时任务,定时删除数据,以避开业务高峰。
但是部署上线时发现一个问题:删除的数据量大概是 20 Million 条,但是 kafka 中的消息数量是 40 Million 条,且每条消息都是删除操作。
演示如下图中所示,针对同一条数据的删除操作,source connector 投递了两条消息,导致数据量被放大。

文档查阅:
When a row is deleted, the delete event value still works with log compaction, because Kafka can remove all earlier messages that have that same key. However, for Kafka to remove all messages that have that same key, the message value must be null. To make this possible, after the Debezium MySQL connector emits a delete event, the connector emits a special tombstone event that has the same key but a null value.
这意味着当一条数据被删除时,source connector 会先投递一条删除事件,然后再投递一条 tombstone 事件。这样做的目的是为了保证 kafka 的 log compaction 机制能够正常工作,即如果一条数据被删除后,当 log compaction 开启时,kafka 可以删除所有之前的消息,只保留最新的消息(即被删除的状态),当其他系统消费时,只需要关注最新的状态即可。
Kafka Log Compaction 参考:Kafka Log Compaction
但在我们的实际场景中,Log Compaction 机制并不适用也没有开启,因此不需要 tombstone 事件,只需要删除事件即可。不适用的原因在于,当数据被删除时离它的创建时间已经过去了很久,同时 kafka 中也只保留 7d 的数据,因此 tombstone 事件对我们来说没有意义。
处理手段:
- 调整 source connecor 配置,增加 unwrap tranform 以删除不必要的删除事件。
- "transforms": "Reroute",
+ "transforms": "Reroute,unwrap",
+ "transforms.unwrap.type": "io.debezium.transforms.ExtractNewRecordState",
+ "transforms.unwrap.delete.handling.mode": "none",
+ "transforms.unwrap.delete.tomstones.handling.mode": "tomstone",
调整后的效果如下图所示:

- 还可以直接调整 source connector 的配置,不产生任何的删除事件,从而减少消息量。
- "transforms": "Reroute",
+ "transforms": "Reroute,unwrap",
+ "transforms.unwrap.type": "io.debezium.transforms.ExtractNewRecordState",
+ "transforms.unwrap.drop.tombstones": "true",
+ "transforms.unwrap.delete.handling.mode": "drop"
1.3 CDC kafka-connect mongodb 数据同步任务异常(消息超过 1MB ) #
这个问题是偶然发现 mongodb source connector 异常,查看日志发现如下异常:
org.apache.kafka.connect.errors.ConnectException: Unrecoverable exception from producer send callback
	at org.apache.kafka.connect.runtime.WorkerSourceTask.maybeThrowProducerSendException(WorkerSourceTask.java:334)
	at org.apache.kafka.connect.runtime.WorkerSourceTask.prepareToSendRecord(WorkerSourceTask.java:128)
	at org.apache.kafka.connect.runtime.AbstractWorkerSourceTask.sendRecords(AbstractWorkerSourceTask.java:404)
	at org.apache.kafka.connect.runtime.AbstractWorkerSourceTask.execute(AbstractWorkerSourceTask.java:361)
	at org.apache.kafka.connect.runtime.WorkerTask.doRun(WorkerTask.java:204)
	at org.apache.kafka.connect.runtime.WorkerTask.run(WorkerTask.java:259)
	at org.apache.kafka.connect.runtime.AbstractWorkerSourceTask.run(AbstractWorkerSourceTask.java:75)
	at org.apache.kafka.connect.runtime.isolation.Plugins.lambda$withClassLoader$1(Plugins.java:181)
	at java.base/java.util.concurrent.Executors$RunnableAdapter.call(Executors.java:515)
	at java.base/java.util.concurrent.FutureTask.run(FutureTask.java:264)
	at java.base/java.util.concurrent.ThreadPoolExecutor.runWorker(ThreadPoolExecutor.java:1128)
	at java.base/java.util.concurrent.ThreadPoolExecutor$Worker.run(ThreadPoolExecutor.java:628)
	at java.base/java.lang.Thread.run(Thread.java:829)
Caused by: org.apache.kafka.common.errors.RecordTooLargeException: The message is 1096354 bytes when serialized which is larger than 1048576, which is the value of the max.request.size configuration.
如果是熟悉 java + kafka 开发的同学,应该一眼就能看出来是消息超过了 kafka 的 max.request.size 配置,导致消息发送失败。
文档查阅:
这里走了“弯路”去翻了文档,是因为对 java + kafka 开发不熟悉,只是大致猜测是消息尺寸超过了 kafka 的限制,因此查阅了 kafka 的文档。
处理手段:
-
调整 kafka broker 的
message.max.bytes配置,增加消息的最大尺寸。./kafka-configs.sh --zookeeper <zookeeper> --entity-type brokers --entity-name <broker_id> --alter --add-config message.max.bytes=10485760 -
调整 kafka connect 的配置,增加
producer.max.request.size配置。+ producer.max.request.size=10485760 // 10MB
1.4 CDC Elasticsearch sink 怎么自定义索引名称? #
背景: 通过 CDC 将数据异构到 Elasticsearch 中, MySQL 的逻辑表 跟 ES 索引一一对应。随着业务增长,数据量不断增长,索引数量也在不断增加,直到超过了 Elasticsearch 的限制 单一分片的文档数量不能超过 2^31 - 1 约为 21亿个文档。
该数据为流水数据,其业务特性为:只写不改,保存3个月,因此这里的解决思路有两种:
- 调整索引的分片数(之前为 1)
- 根据日期分别索引,比如:
index_name_20240101,index_name_20240102,以此类推。
两种方案有其各自的优缺点:
ES 会尽量让分片分散保存在不同的节点上,降低单个节点故障时的影响。分片的分配策略主要考量两个因素:
分片数量:大多数搜索会命中多个分片,每个分片的搜索会占用搜索线程和其他资源。ES 默认单个节点最多 1000 分片。
分片大小: 分片合理的大小为 10-50GB。一个节点可以容纳的分片数量与节点的堆内存成正比,小于20分片/每GB堆内存;
适当增加分片数会增加系统的吞吐量,提高利用率;但是分片数过多会导致系统的性能下降,增加系统的负担。
-
方案一:调整分片数 (如:1 => 3)
- 优点:
- 业务无感,不需要修改业务代码
- 可以提高吞吐量
- 缺点:
- 分片数调整不灵活,当数据增量再次超限制时,还需要再来一次(重建成本更高)。
- 需要重建索引,在数据量非常大的情况下需要慎重操作,避免长时间降低集群性能
- 优点:
-
方案二:根据日期分别索引,业务中使用 alias 指向全部的索引
- 优点:
- 可以灵活的删除索引数据
- 可以提高查询性能
- 缺点:
- 索引数量,分片数量增加较多,需要考虑集群的性能
- 需要"重建"索引
- ES Sink Connector 需要按照日期索引的能力
- 优点:
The Kafka source topic name is used to create the destination index name in Elasticsearch. You can change this name prior to it being used as the index name with a Single Message Transformation (SMT)–RegexRouter or TimeStampRouter–only when the
flush.synchronouslyconfiguration property is set totrue.https://docs.confluent.io/kafka-connectors/elasticsearch/current/overview.html
这里综合实际情况,选择了方案二。但问题也随之而来,ES Sink Connector 默认使用的 index = topic 也就是 cdc.dbname.tablename 这种形式, 而我们想要的是 index = cdc.dbname.tablename-yyyyMMdd 这种形式。
文档查阅:
- Confluent/Elasticsearch Sink Connector#index
- Confluent/SMT/RegexRouter
- Confluent/SMT/TimestampRouter
经过查阅文档,发现可以使用 SMT 来实现自定义索引名称,其中 RegexRouter 和 TimestampRouter 都是可以的,但是符合我们的场景的是 TimestampRouter。
在 ES Sink Connector 中增加如下配置:
"transforms": "TimestampRouter",
"transforms.TimestampRouter.type": "org.apache.kafka.connect.transforms.TimestampRouter",
"transforms.TimestampRouter.topic.format": "foo-${topic}-${timestamp}",
"transforms.TimestampRouter.timestamp.format": "YYYYMM"
这样就可以实现自定义索引名称了 ordersTopic 经过上述配置后: foo-ordersTopic-202401。但是这里需要注意 timestamp 的来源是 kafka message.timestamp,而不是 message.key/value 中的 timestamp 字段。
一般来说流水这种记录场景是够用的,可能会存在日期偏移的情况。比如:record 的实际创建时间为 2024-01-01 23:59:59,但是实际写入 kafka 的时间为 2024-01-02 00:00:00,这样该条记录会被路由到 foo-ordersTopic-20240201 索引中。
处理手段:
参考 TimestampRouter 的设计和代码,我们自定义一个 transform,实现根据 message.value 中的 field 字段来生成时间戳, 再组装 ES index 名。具体实现参见 #1.5 自定义 MessageTimestampRouter。
1.5 自定义 MessageTimestampRouter 实现动态索引名称 #
预期的使用效果是:
{
  "transforms.TimestampRouter.type": "com.custom.kafka.connect.transforms.MessageTimestampRouter",
  "transforms.TimestampRouter.topic.format": "${topic}-${timestamp}",
  "transforms.TimestampRouter.timestamp.format": "yyyyMMdd",
  "transforms.TimestampRouter.message.timestamp.field": "created_at"
}
messageValue        : {"created_at": "2024-01-01 00:00:00", "id": 1}
sourceTopicName     : ordersTopic
destinationIndexName: ordersTopic-20240101
文档查阅:
- github/kafka/org.apache.kafka.connect.transforms.TimestampRouter
- Custom Kafka Connect Single Message Transforms
处理手段:
- 新建一个 java 工程,创建一个 class 继承
org.apache.kafka.connect.transforms.Transformation接口。
/**
 * Single message transformation for Kafka Connect record types.
 * <p>
 * Connectors can be configured with transformations to make lightweight message-at-a-time modifications.
 * <p>Kafka Connect may discover implementations of this interface using the Java {@link java.util.ServiceLoader} mechanism.
 * To support this, implementations of this interface should also contain a service provider configuration file in
 * {@code META-INF/services/org.apache.kafka.connect.transforms.Transformation}.
 *
 * @param <R> The type of record (must be an implementation of {@link ConnectRecord})
 */
public interface Transformation<R extends ConnectRecord<R>> extends Configurable, Closeable {

    /**
     * Apply transformation to the {@code record} and return another record object (which may be {@code record} itself)
     * or {@code null}, corresponding to a map or filter operation respectively.
     * <p>
     * A transformation must not mutate objects reachable from the given {@code record}
     * (including, but not limited to, {@link org.apache.kafka.connect.header.Headers Headers},
     * {@link org.apache.kafka.connect.data.Struct Structs}, {@code Lists}, and {@code Maps}).
     * If such objects need to be changed, a new {@link ConnectRecord} should be created and returned.
     * <p>
     * The implementation must be thread-safe.
     *
     * @param record the record to be transformed; may not be null
     * @return the transformed record; may be null to indicate that the record should be dropped
     */
    R apply(R record);

    /** Configuration specification for this transformation. */
    ConfigDef config();

    /** Signal that this transformation instance will no longer will be used. */
    @Override
    void close();
}
- 定义 ConfigDef 配置项,用于配置 transformation。
  /**
   * 配置参数
   * message.timestamp.field: 时间戳字段名
   * topic.format: 主题格式
   * timestamp.format: 时间戳处理格式化
   */
  public static final ConfigDef CONFIG_DEF = new ConfigDef()
      .define(ConfigName.MESSAGE_TIMESTAMP_FIELD, ConfigDef.Type.STRING, "created_at", ConfigDef.Importance.HIGH, "时间戳字段名")
      .define(ConfigName.TOPIC_FORMAT, ConfigDef.Type.STRING, "${topic}-${timestamp}", ConfigDef.Importance.HIGH, "主题格式")
          .define(ConfigName.TIMESTAMP_FORMAT, ConfigDef.Type.STRING, "yyyyMMdd", ConfigDef.Importance.HIGH, "时间戳处理格式");

  @Override
  public ConfigDef config() {
      return CONFIG_DEF;
  }
- 实现 apply 方法,用于按照需求处理 record 的 topic。
  @Override
  public R apply(R record) {
      Long timestamp = null;

      // 尝试从记录值中获取时间戳
      if (record.value() instanceof Struct) {
          Struct value = (Struct) record.value();
          try {
              Field field = value.schema().field(messageTimestampField);
              if (field != null) {
                  timestamp = value.getInt64(messageTimestampField);
              }
          } catch (Exception e) {
              log.warn("Failed to extract timestamp from field {}: {}", messageTimestampField, e.getMessage());
          }
      }

      // 如果无法从字段获取时间戳,则使用记录的时间戳
      if (timestamp == null) {
          log.warn("No timestamp found in record.value {}, trying record.timestamp", messageTimestampField);
          timestamp = record.timestamp();
          if (timestamp == null) {
              log.warn("No timestamp found in record, using current time");
              timestamp = System.currentTimeMillis();
          }
      }

      // 格式化时间戳
      String formattedTimestamp = timestampFormat.get().format(new Date(timestamp));

      // 替换主题格式中的变量
      String updatedTopic = topicFormat
          .replace("${topic}", record.topic())
          .replace("${timestamp}", formattedTimestamp);

      // log.info("Updated topic: {}", updatedTopic);

      // 创建新记录
      return record.newRecord(
          updatedTopic,
          record.kafkaPartition(),
          record.keySchema(),
          record.key(),
          record.valueSchema(),
          record.value(),
          record.timestamp()
      );
  }
1.6 CDC kafka-connect mongodb 侧反复进行 “快照” 导致数据同步异常 #
导致这个现象的起始原因是,mongodb 数据库中有多个集合,其中拥有非常多的过期数据,超过 8000w 条,导致了明显的慢查询,因此开发增加了 TTL 索引来自动删除过期数据。当然这两个集合配置在了 mongodb source connector 中,需要同步变更。
但是在实际运行中,发现 mongodb source connector 反复进行“快照”,mongodb source connector 的生产速率监控如下:
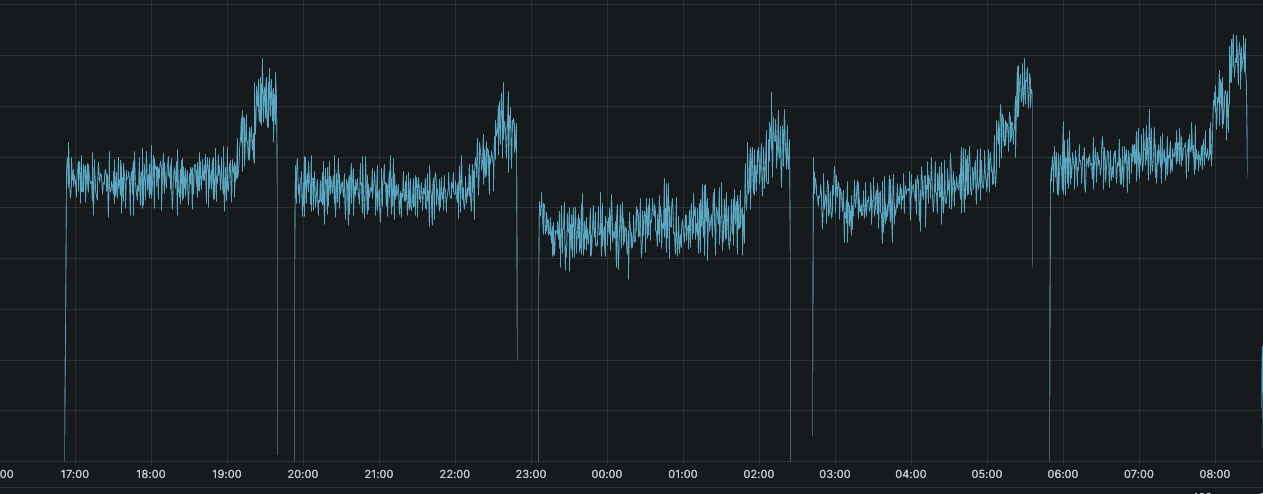
该集合正常生产的速率约为 20条/s,图中的速率已经达到 2000条/s,且反复出现。
文档查阅:
However, if no offset is found, or if the oplog no longer contains that position, the task must first obtain the current state of the replica set contents by performing a snapshot.
如果没有找到 offset,或者 oplog 中不再包含该位置,则任务必须首先通过执行快照来获取副本集内容的当前状态。
总结一下,Mongodb source connector 会在以下情况下执行快照:
- 初次启动 connector 时,找不到保存的偏移量
- 偏移量过期,oplog 中不再包含该位置
这里遇到的情况属于第二种情况,即偏移量过期,oplog 中不再包含该位置。由于删除的数据量非常大,导致 oplog 滚动非常快,mongodb source connector 保存的偏移量很快就过期了,因此会触发快照。
而导致反复快照的原因也类似,执行快照的集合中有非常大的集合超过 100 million 条数据,导致快照时间非常长,快照过程中,oplog 继续滚动,导致快照结束后,保存的偏移量已经过期,因此会再次触发快照。陷入了一个死循环。
处理手段:
这里优化的方向有两个:
- 缩短快照持续时间
- 增大 oplog 的大小
db.oplog.rs.stats()

// 其中 maxSize 字段表示 oplog 的最大大小,单位为 B
{
  maxSize: 10632303360 // 约 10GB
}
缩短快照可以 增加快照线程数 来提高并发度:
+ "snapshot.max.threads": 6 // 默认值为 1
还可以 拆分成多个 connector 来增加并发度。
个人经验: 采用 include 这种显式包含的方式来指定需要同步的集合,而不是 exclude 排除的方式。
至于是调大 oplog ,则需要根据实际情况来定。可以通过查看 oplog 的使用情况来判断是否需要调大 oplog 的大小:
> rs.printReplicationInfo()

actual oplog size
'10139.754638671875 MB'
---
configured oplog size
'10139.754638671875 MB'
---
log length start to end
'5012612 secs (1392.39 hrs)'
---
// 其他
如果确实需要调大 oplog 的大小,可以参考如下文档:
db.adminCommand(
  {
    replSetResizeOplog: 1,
    size: <double>,           // 以 MB 为单位
    minRetainHours: <double>  // 可选,最小保留时间,单位为小时, 如 1.5 代表 1h30m
  }
)
另外文档中还提到了,增量快照 的方式来解决大数据量的快照问题:
- 增量快照的含义就是不会一次性快照完数据库的完整状态,而是分批(块)的快照每个集合(可以自定义集合和块大小)。
- 增量快照运行是, oplog stream change 应用也会同步进行,而不用等待快照完成后
- 增量快照停止后恢复也不会从头开始,而是从上次快照的地方继续
- 由于增量快照是基于信号触发的(向 数据库信号集合 插入新数据 / 发布Kafka 信号消息),因此可以随时触发快照
小结:增量快照可以很好规避的大数据量快照的问题,只是会增加使用成本。
经验总结:
- 如果存在超大数据量的集合,建议使用增量快照
- Mongodb source connector 的快照线程默认为 1,对于大数据量的集合,建议增加快照线程数
- 如果 oplog 滚动过快,建议增大 oplog 的大小
2. DMS 数据同步相关 #
DMS 是 Data Migration Service 的缩写,即数据迁移服务。DMS 是一种数据迁移服务,用于将数据从一个地方迁移到另一个地方。DMS 通常用于数据迁移、数据备份、数据恢复等场景。
2.1 数据迁移完成后,怎么对比源数据和目标数据是否一致? #
在实际场景中,可能会有数据迁移的需求,比如说将数据从一个数据库迁移到另一个数据库,或者将数据从一个表迁移到另一个表。在迁移完成后,我们需要对比源数据和目标数据是否一致,以保证数据的一致性。
这里记录下在检索中出来可以使用的一些工具:
- tidb-tools/sync_diff_inspector: 是一个可以对比两个数据库并且输出差异的工具,支持 MySQL 和 TiDB 数据库。使用文档参考:sync_diff_inspector#usage
- pt-table-checksum: 是 Percona Toolkit 中的一个工具,用于检查 MySQL 复制的一致性。
- pt-table-sync: 是 Percona Toolkit 中的一个工具,用于同步两个表的数据。
2.2 如果不一致怎么处理? #
tidb-tools/sync_diff_inspector 可以输出修复SQL。Percona Toolkit 中的 pt-table-sync 也可以用于同步两个表的数据。
3. Istio 相关 #
3.1 Istio 中多个 gateway 使用相同 host,analyze 是提示错误 #
在 Istio 中,gateway 是一个虚拟服务,用于将流量路由到对应的服务。gateway 有一个 host 字段,用于指定域名。在实际场景中,可能会有多个 gateway 使用相同的 host,这样就会导致 analyze 时提示错误。
3.2 Istio 中一个服务提供了多个端口的服务,怎么配置 Virtual Service ? #
我们有一个短信服务,它同时提供了 HTTP 和 gRPC 服务,分别使用了 8000 和 50051 端口。在没有使用 istio 去路由流量的时候,在 k8s 中配置这个服务其实很简单,只需要在 Service 中配置多个端口即可。如下:
apiVersion: v1
kind: Service
metadata:
  name: sms-service
spec:
  selector:
    app: sms-service
  ports:
    - name: http
      port: 8000
      targetPort: 8000
    - name: grpc
      port: 50051
      targetPort: 50051
但是在使用 istio 时,需要配置 Virtual Service 来路由流量,那么如何配置 Virtual Service 来支持多个端口的服务呢?
文档查阅:
HTTPRoute
Describes match conditions and actions for routing HTTP/1.1, HTTP2, and gRPC traffic. See VirtualService for usage examples.
http[].match.port (Optional) uint32
Specifies the ports on the host that is being addressed. Many services only expose a single port or label ports with the protocols they support, in these cases it is not required to explicitly select the port.
从这一节文档,我们得知 HTTPRoute 可以用于路由 HTTP/1.1、HTTP2 和 gRPC 流量,因此我们可以使用 HTTPRoute 来配置 Virtual Service。match 匹配条件中的 port 字段可以用于指定端口,专门用于单个服务提供多端口的场景。需要注意的是 port 代表的是访问地址中的端口,而不是服务暴露的端口。
处理手段:
- 在 Virtual Service 配置中,新增多个 httpRoute 来路由到不同的端口。
apiVersion: networking.istio.io/v1alpha3
kind: VirtualService
metadata:
  name: sms-service
spec:
  hosts:
    - api.my
  http:
    - name: http
      match:
        - uri:
            prefix: /
          port: 80
      route:
        - destination:
            host: sms-service
            port:
              number: 8000
    - name: grpc
      match:
        - port: 50051
      route:
        - destination:
            host: sms-service
            port:
              number: 50051
4. APISIX 相关 #
4.1 使用 APISIX 作为网关,怎么进行有条件的响应重写? #
响应重写属于网关的基本功能,APISIX 作为一个开源的网关,也支持响应重写。但是在实际场景中,可能会有一些特殊的需求,比如说只有满足一定条件时才进行响应重写。举个实际的例子:
当服务器要进行停机维护的时候,我们希望所有的请求,不论是客户端还是第三方请求的请求,都响应 503 状态码,并且返回一个提示信息 “服务器正在维护中,预计维护时间为 2024-12-17 00:00:00 - 2024-12-17 06:00:00”,同时还有另外一个要求当服务器恢复时,可以允许特定的请求通过,比如说只有来自公司内部的请求才可以通过。
这里默认客户端是支持展示这种响应的,因此不考虑客户端展示问题。
文档查阅:
这里关注该插件的以下几个属性:
- status_code: 响应状态码
- body: 响应体,可以是字符串或者 base64 编码的字符串。!!!注意 body 和 filters 不能同时使用。
- body_base64: 用于指示 body 是否 base64 编码
- vars: 用于匹配条件,支持多个匹配条件。
- 变量列表参考:
- Nginx 变量:https://nginx.org/en/docs/varindex.html
- APISIX 变量:https://apisix.apache.org/docs/apisix/apisix-variable/
- 操作符参考:https://github.com/api7/lua-resty-expr#operator-list
- 变量列表参考:
- filters: 对 body 内容进行正则匹配并替换。
vars 配置举例:
# 匹配所有查询参数带有 pkg=com.company.io 的请求
vars:
  - - arg_pkg
    - ~=
    - "com.company.io"
filter 配置举例:
# 这个配置会将响应体中的所有 Example 替换为 Example-Replaced
filters:
  - regex: Example
    scope: global
    replace: Example-Replaced
    options: "jo" # 正则匹配选项,参见 https://github.com/openresty/lua-nginx-module#ngxrematch
处理手段:
在 ApisixRoute 配置中,配置 response-rewrite 插件,设置 body 为维护提示信息,设置 vars 为特定请求的匹配条件。
代码片段
apiVersion: apisix.apache.org/v2
kind: ApisixRoute
metadata:
  name: account-api
spec:
  http:
    - name: account-api
      backends:
        - serviceName: account-api
          servicePort: 8000
      match:
        hosts:
          - api.example.com
        paths:
          - /account/*
      plugins:
        - name: cors
          enable: true
        - name: response-rewrite
          enable: true
          body: >-
            {
              "code": 503,
              "message": "服务器正在维护中,预计维护时间为 2024-12-17 00:00:00 - 2024-12-17 06:00:00"
            }
          body_base64: false # 是否 body base64,适用于二进制数据
          vars:
            - - arg_pkg
              - ~=
              - "com.company.io"
4.2 APISIX 插件的执行顺序是怎么样的? #
APISIX 会优先执行全局的插件,然后再执行路由级别的插件。每个插件内部定义了一个优先级 priority,优先级越高的插件越先执行。

如果想要调整插件的顺序,可以配置 _meta 字段, 参见 APISIX#Plugin Custom priority
5. ShardingSphere Proxy #
5.1 HINT策略 在 ShardingSphere Proxy 中的使用 #
在前文 ShardingSphere Proxy 问题几则 中提到了 Shardingsphere 支持 HINT 策略,即通过 SQL Hint 来指定路由规则。
这里的场景是针对已经使用了标准分片算法中 Inline 策略的场景,但是个别场景没有办法使用分片键进行路由,因此需要使用 HINT 策略。比如说有一个 t_order 表,进行了数据分片,分库分表的策略是:根据 mch_id 取模分为 2 个库,根据 user_id 取模分为 2 个表。
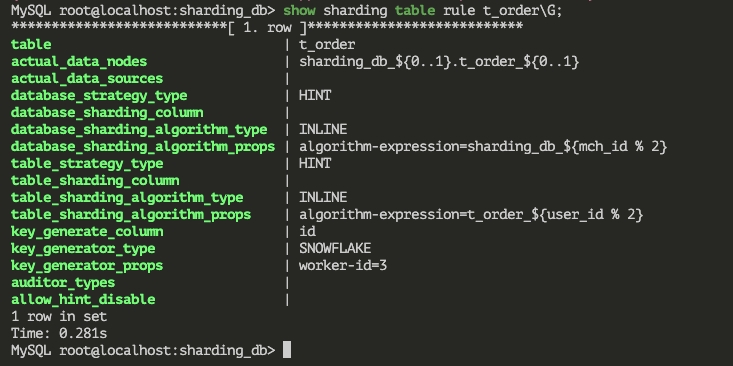
现在要针对这个表清理数据。最简单的想法就是直接执行 DELETE FROM t_order WHERE created_at < 'yyyy-MM-dd' 来清理数据,但是很明显直接删除会导致性能问题。可以考虑使用批量删除的方式,例如:
DELETE FROM t_order WHERE created_at < 'yyyy-MM-dd' limit 1000;
但是这样的方式不被 Shardingsphere Proxy 支持,因为这样的 SQL 语句没有分片键会导致全路由,Shardingsphere Proxy 并不支持。

文档查阅:
这里需要提前开启 sqlCommentParseEnable 选项,以支持 sql comment 解析。
处理手段:
想要让这样的删除语句可以落到特定的分片上去,那么我们可以使用 HINT 策略,即在 SQL 语句中添加 Hint 来指定路由规则,如下:
/* ShardingSphere hint: dataSourceName=sharding_db_0 */ delete from t_order_0 where created_at < 'yyyy-MM-dd' limit 1000;

6. Kafka 相关 #
6.1 如何将迁移kafka集群中的数据? #
在实际场景中,可能会有迁移 kafka 集群的需求,比如说迁移到新的集群,或者迁移到新的版本等。这里的迁移是指迁移数据,而不是迁移集群。一般说来,kafka 数据迁移分为两种:
- 集群内迁移:比如新增一个 broker, 需要将现有的数据重新分布,已实现负载均衡。
bin/kafka-reassign-partitions.sh脚本可以用于迁移数据, 参见 Kafka#automigrate - 集群间迁移:比如将 cluster-ea 中的 topic-demo 整体迁移到 cluster-eu 中。
查阅文档/思路总结:
跨集群迁移的思路是:
- 使用 mirror-maker 先将数据从 cluster-ea 中复制到 cluster-eu 中。
- 迁移所有的消费者到 cluster-eu 中
- 迁移所有的生产者到 cluster-eu 中
处理手段:
以下命令仅供参考,具体的参数需要根据实际情况调整。
-
使用 mirror-maker 复制数据
./kafka-mirror-maker.sh --consumer.config consumer.properties --producer.config producer.properties --whitelist "topic-demo" -
迁移消费者
修改消费者配置文件中的 bootstrap.servers 为新的集群地址
-
迁移生产者
修改生产者配置文件中的 bootstrap.servers 为新的集群地址
-
停止 mirror-maker
7. Pyroscope 相关 #
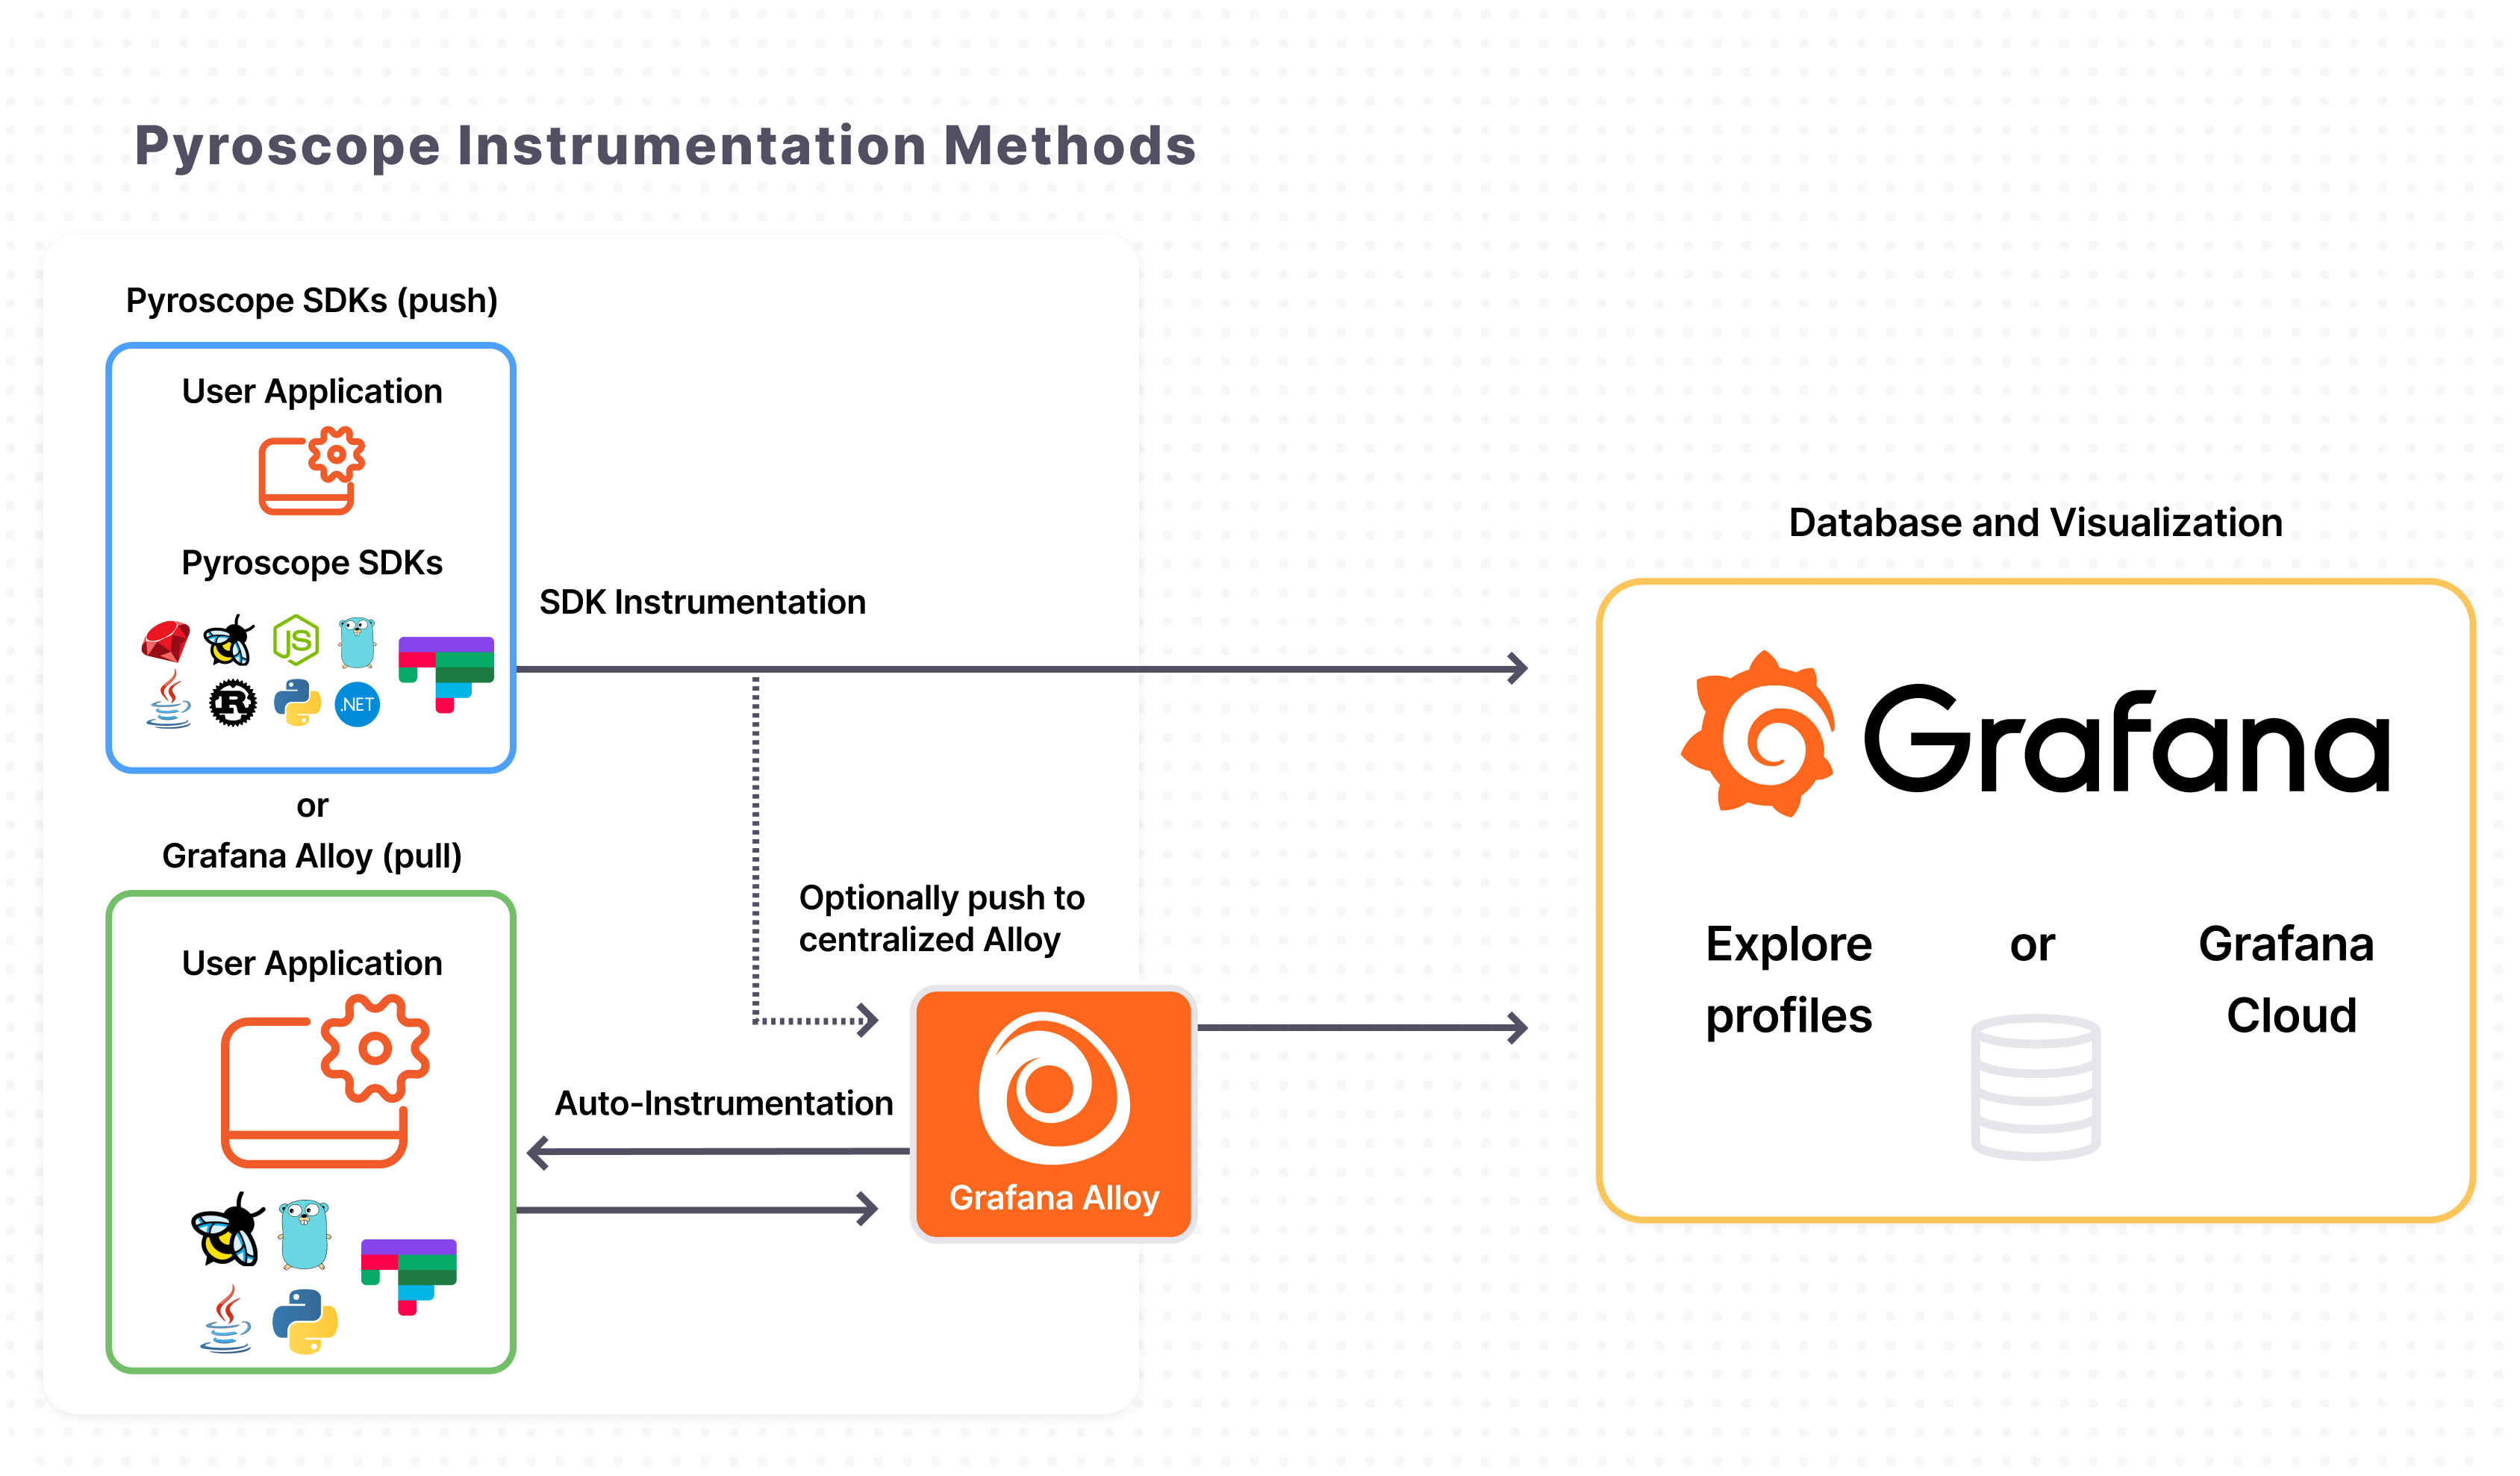
Pyroscope 是一个开源的性能监控工具,支持多种语言 SDK,支持多种采集模式。Pyroscope 有两种采集模式:
- Pull 模式:Pyroscope 会定时从应用程序中拉取数据。程序需要主动暴露相应的端口,参见:Pyroscope#Scrape
- Push 模式:应用程序通过内置 SDK 主动推送数据到 Pyroscope,参见:Pyroscope#Push
如下:
7.1 使用 Go Pull 模式采集数据时为什么只有 cpu + gourotines + cpu samples 三个指标? #
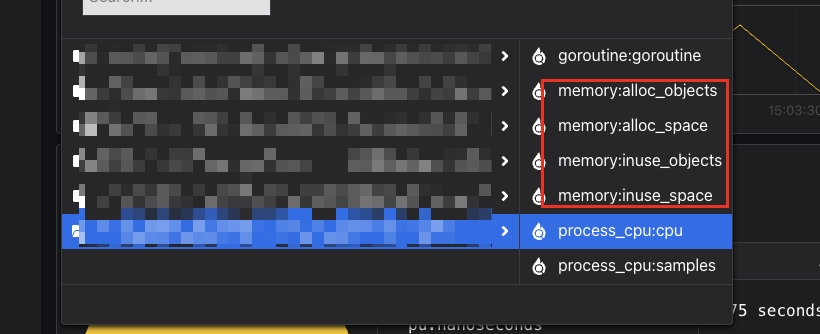
按照官方文档配置好 Alloy 服务,并在应用上暴露 /debug/pprof/* 等端口之后(使用标准库的 pprof),发现在 Pyroscope 中只有 cpu + gourotines + cpu samples 三个指标,而没有其他的指标。如下图:
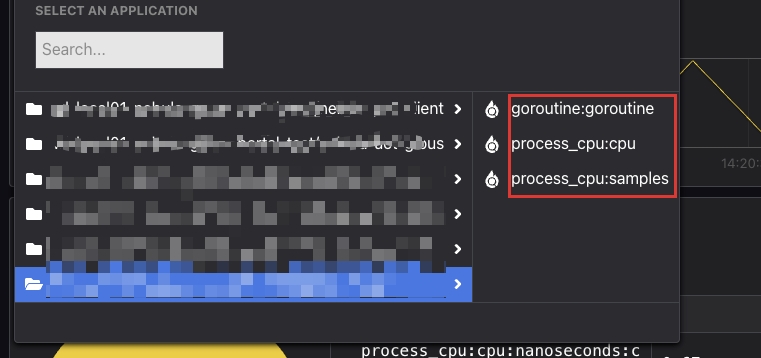
此时使用的 alloy scrape 配置如下:
代码片段
pyroscope.scrape "scrape_job_name" {
        // 这部分仅作演示
        targets    = [{"__address__" = "localhost:4040", "service_name" = "example_service"}]
        forward_to = [pyroscope.write.write_job_name.receiver]

        // 关注这部分配置
        profiling_config {
                profile.process_cpu {
                        enabled = true
                }

                profile.godeltaprof_memory {
                        enabled = true
                }

                profile.memory { // disable memory, use godeltaprof_memory instead
                        enabled = false
                }

                profile.godeltaprof_mutex {
                        enabled = true
                }

                profile.mutex { // disable mutex, use godeltaprof_mutex instead
                        enabled = false
                }

                profile.godeltaprof_block {
                        enabled = true
                }

                profile.block { // disable block, use godeltaprof_block instead
                        enabled = false
                }

                profile.goroutine {
                        enabled = true
                }
        }
}
文档查阅:
通过文档就很明了了,因为 alloy scrape 任务配置的 memory、mutex、block 等指标都都指向了 godeltaprof_memory、godeltaprof_mutex、godeltaprof_block 等指标,其访问路径期望是 /debug/pprof/delta_heap 而不是应用实际暴露的 /debug/pprof/allocs,所以才有没有 memory 相关的指标。
而 delta_heap 等指标是在应用程序中通过 SDK 新增的指标,对于 Go 标准库中的 pprof 并不包含。
关于 godeltaprof 这个包,是 runtime/pprof 的一个 fork 版本:减少了内存分配,相应的GC压力更小;同时支持惰性采样,采样更加高效(样本尺寸更小)。
处理手段1:
在应用程序中使用 pyroscope SDK,新增 godeltaprof 指标。
处理手段2:
继续在应用程序中使用标准库的 pprof,调整 scrape 配置,将 memory、mutex、block 等指标指向标准库的 pprof。
代码片段
                profile.godeltaprof_memory {
-                        enabled = true
+                        enabled = false
                }

                profile.memory { // disable memory, use godeltaprof_memory instead
-                        enabled = false
+                        enabled = true
                }

                profile.godeltaprof_mutex {
-                        enabled = true
+                        enabled = false
                }

                profile.mutex { // disable mutex, use godeltaprof_mutex instead
-                        enabled = false
+                        enabled = true
                }

                profile.godeltaprof_block {
-                        enabled = true
+                        enabled = false
                }

                profile.block { // disable block, use godeltaprof_block instead
-                        enabled = false
+                        enabled = true
                }
效果展示:
调整后的效果如下图所示,已经正常展示:
8. Doris 相关 #
8.1 动态分区表插入数据时失败,提示 “no partition for this tuple” #
存在这么一个动态分区表 根据 day 字段动态分区,其 DDL 如下:
create table if not exists a_daily_tbl (
    `mch_id` INT not null,
    `user_id` BIGINT not null,
    `day` DATE not null,
    `type` VARCHAR(64) not null,
    `count` INT SUM,
    `total` BIGINT SUM,
    `add_total` BIGINT SUM,
    `updated_at` DATETIME MAX
)
AGGREGATE KEY(`mch_id`, `user_id`, `day`,`type`)
PARTITION BY range (`day`) ()
DISTRIBUTED BY HASH(`mch_id`, `user_id`) BUCKETS AUTO
PROPERTIES (
    "replication_allocation" = "tag.location.default: 3",
    "dynamic_partition.enable" = "true",
    "dynamic_partition.time_unit" = "DAY",
    "dynamic_partition.start" = "-90",
    "dynamic_partition.end" = "1",
    "dynamic_partition.prefix" = "a_daily_tbl_prefix",
    "dynamic_partition.buckets"="2",
    "dynamic_partition.create_history_partition"="true"
);
当某一天如 2024-12-31 这一天的数据想要插入未来的一条数据,执行如下 SQL 语句:
INSERT INTO a_daily_tbl values (101, 101743183, '2025-01-02', 'type_1', 1, 5000000, 5000000, '2025-01-02 02:40:16');
提示错误:
errCode = 2, detailMessage = Insert has filtered data in strict mode. url: http://HOST:PORT/api/_load_error_log?file=__shard_3/error_log_insert_stmt_16be9eb83cde44be-a0ecc5687c9ead8e_16be9eb83cde44be_a0ecc5687c9ead8e

# 链接中的内容如下:
Reason: no partition for this tuple. tuple=
+---------------+---------------+---------------+---------------+-----------------+-----------------+-----------------+----------------------+
|(Int32)        |(Int64)        |(DateV2)       |(String)       |(Nullable(Int32))|(Nullable(Int64))|(Nullable(Int64))|(Nullable(DateTimeV2))|
+---------------+---------------+---------------+---------------+-----------------+-----------------+-----------------+----------------------+
|            101|      101743183|     2025-01-02|           type_1|                1|          5000000|          5000000|   2025-01-02 02:40:16|
+---------------+---------------+---------------+---------------+-----------------+-----------------+-----------------+----------------------+
. src line [];
文档查阅:
根据文档,动态分区表的分区范围是在 dynamic_partition.start 和 dynamic_partition.end 之间的,如果插入的数据超出了这个范围,就会提示 “no partition for this tuple”。
dynamic_partition.start
The starting offset of the dynamic partition, usually a negative number. Depending on the time_unit attribute, based on the current day (week / month), the partitions with a partition range before this offset will be deleted. If not filled, the default is -2147483648, that is, the history partition will not be deleted.
代表动态分区的起始偏移量,通常是一个负数。根据 time_unit 属性的不同,基于当前的天(周/月),在这个偏移量之前的分区范围的分区将被删除。如果未填写,则默认为 -2147483648,即历史分区不会被删除。
dynamic_partition.end
The end offset of the dynamic partition, usually a positive number. According to the difference of the time_unit attribute, the partition of the corresponding range is created in advance based on the current day (week / month).
代表动态分区的结束偏移量,通常是一个正数。根据 time_unit 属性的不同,基于当前的天(周/月),提前创建对应范围的分区。
处理手段:
因此从 DDL 中可以看出,这个表的动态分区范围是从 -90 天到 1 天,因此当我们在 2024-12-31 这一天插入 2025-01-02 (cur + 2) 这一天的数据时,超出了动态分区的范围,因此提示分区不存在。
那么解决办法要么就是调整插入数据的时间,要么就是调整动态分区的范围。
-
调整动态分区的范围,将
dynamic_partition.end调整为 2 天。ALTER TABLE a_daily_tbl SET ("dynamic_partition.end" = "2");然后稍等片刻,确认分区已经创建
show partitions from a_daily_tbl,然后再插入数据就可以了。